I wasn’t actually planning on sharing with you my latest painted furniture project but it came out so nice that it would have been a shame not to. Besides it’s been ages since I did a proper furniture makeover post that actually involved painting. I think the last one I did on here was for my daughter’s bedside cabinet. But thanks to my non existing SEO skills back them, the post quickly disappeared into the world of the internet. So the chances are that you’ve never actually seen it… (and if you haven’t hop over here)
The true is that painting is still my favourite way of updating furniture. So why shouldn’t I be sharing with you guys things that I like to do the most?! Exactly!
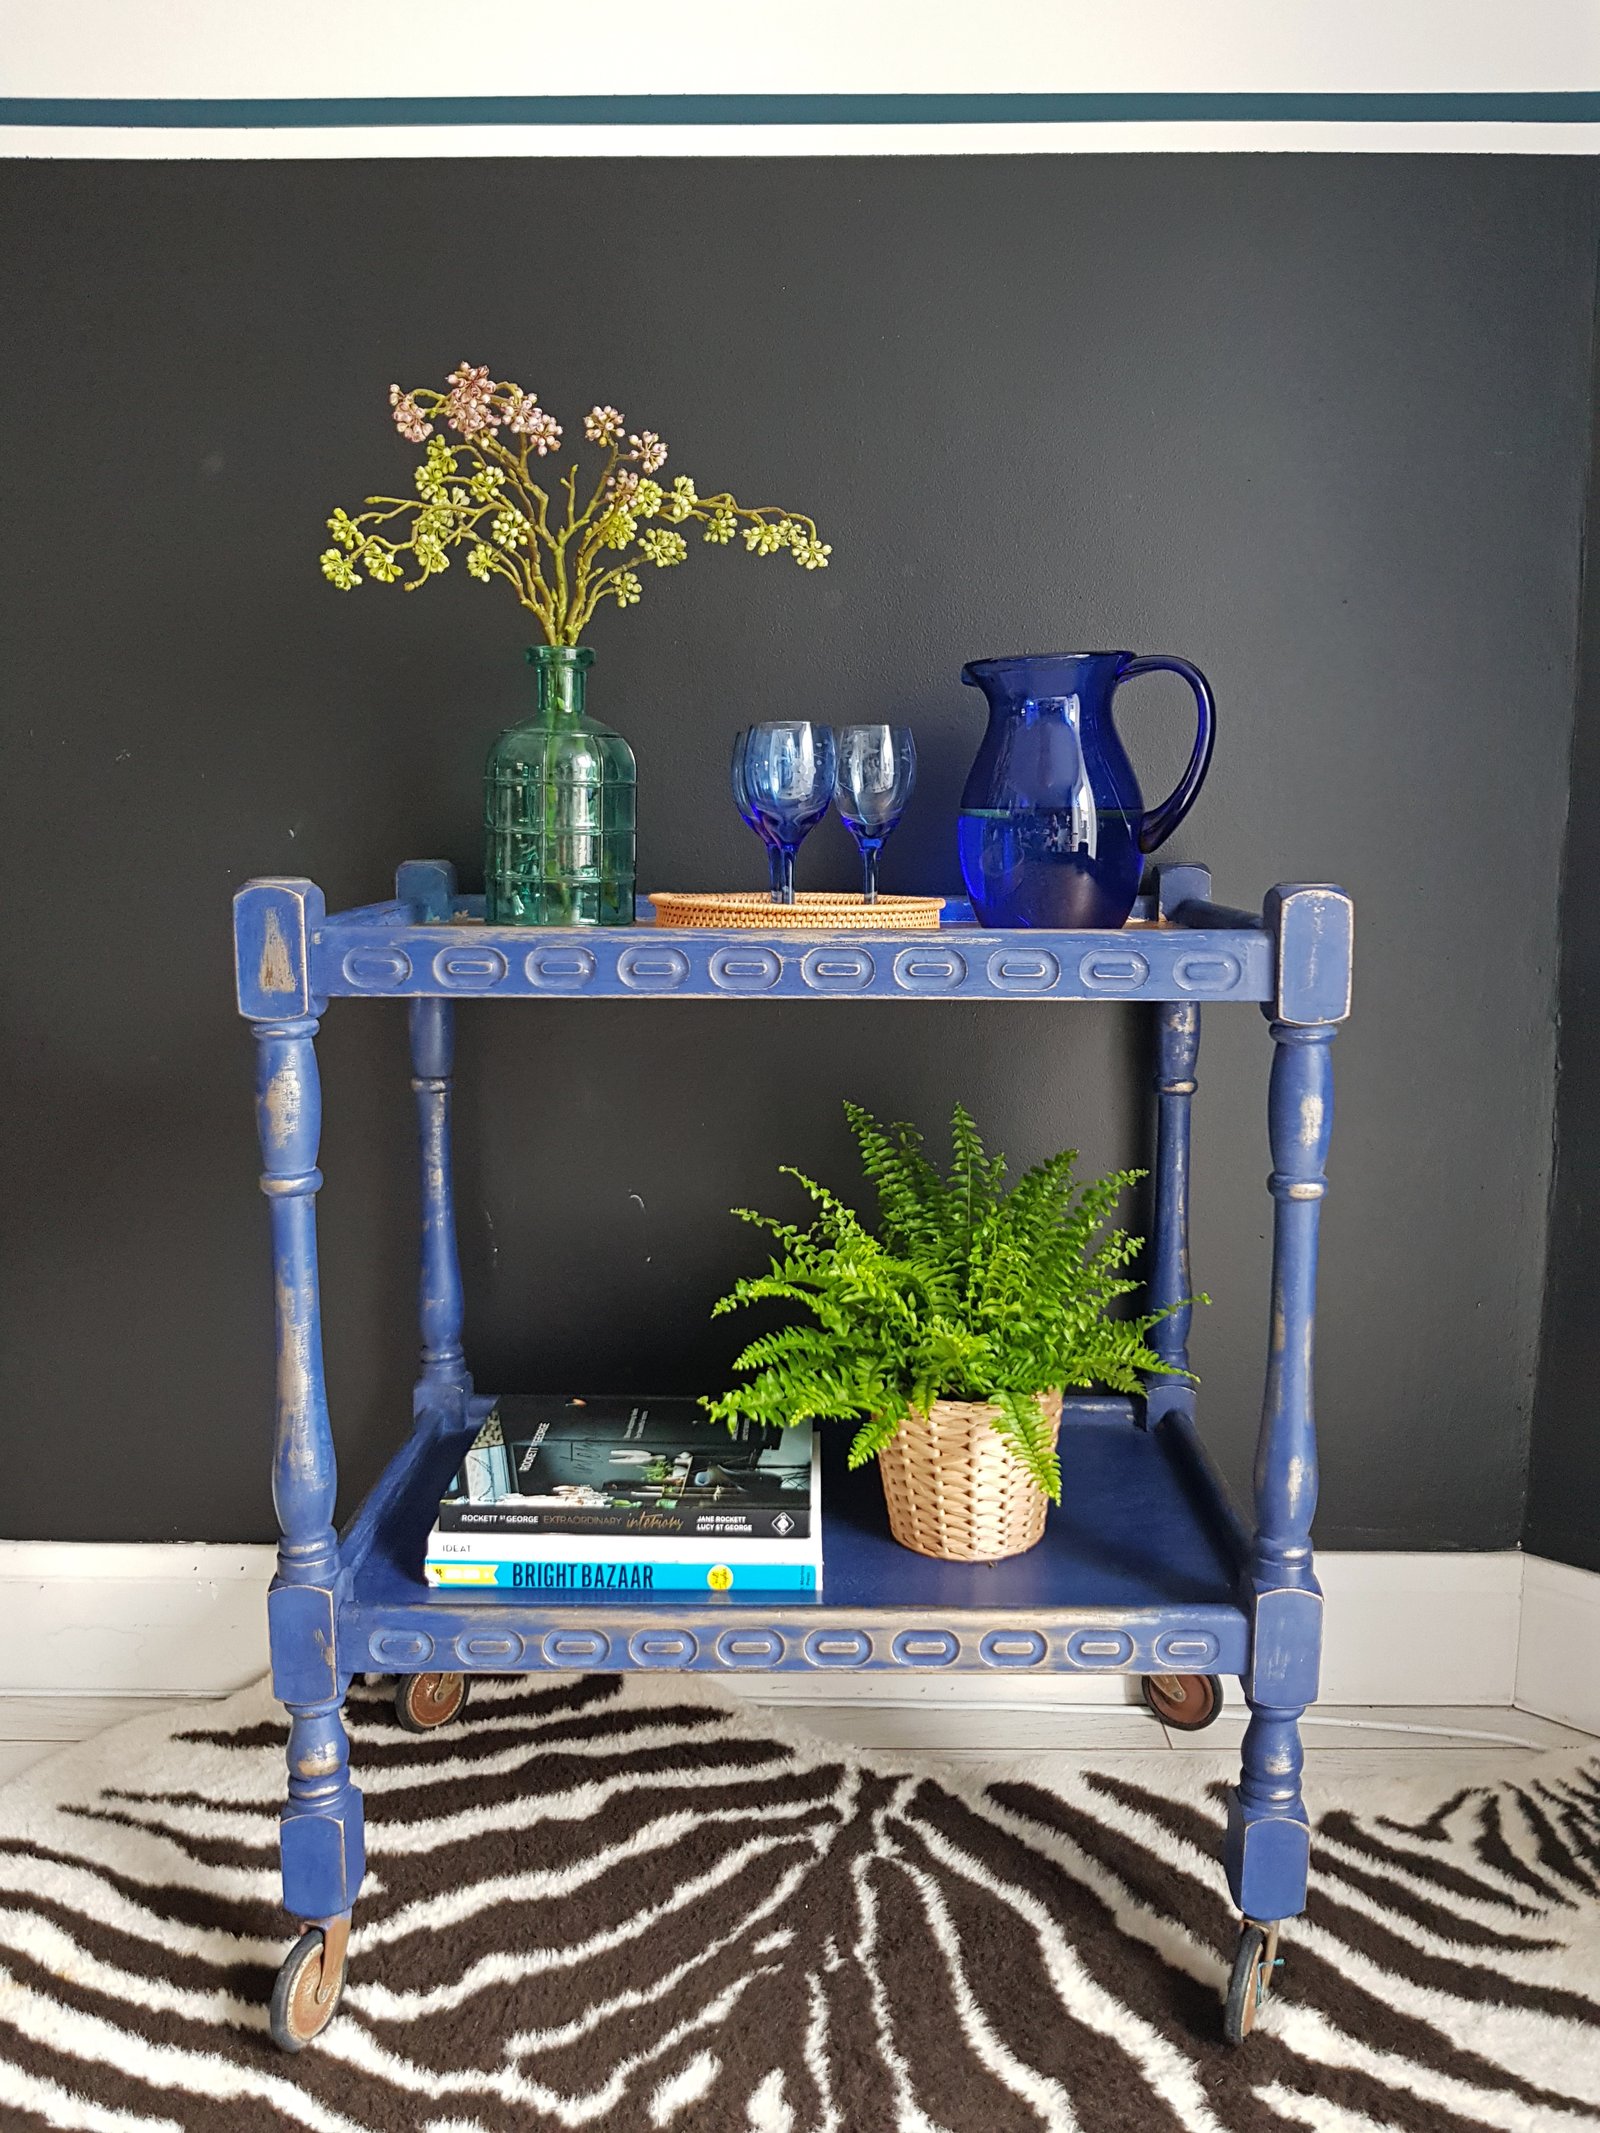
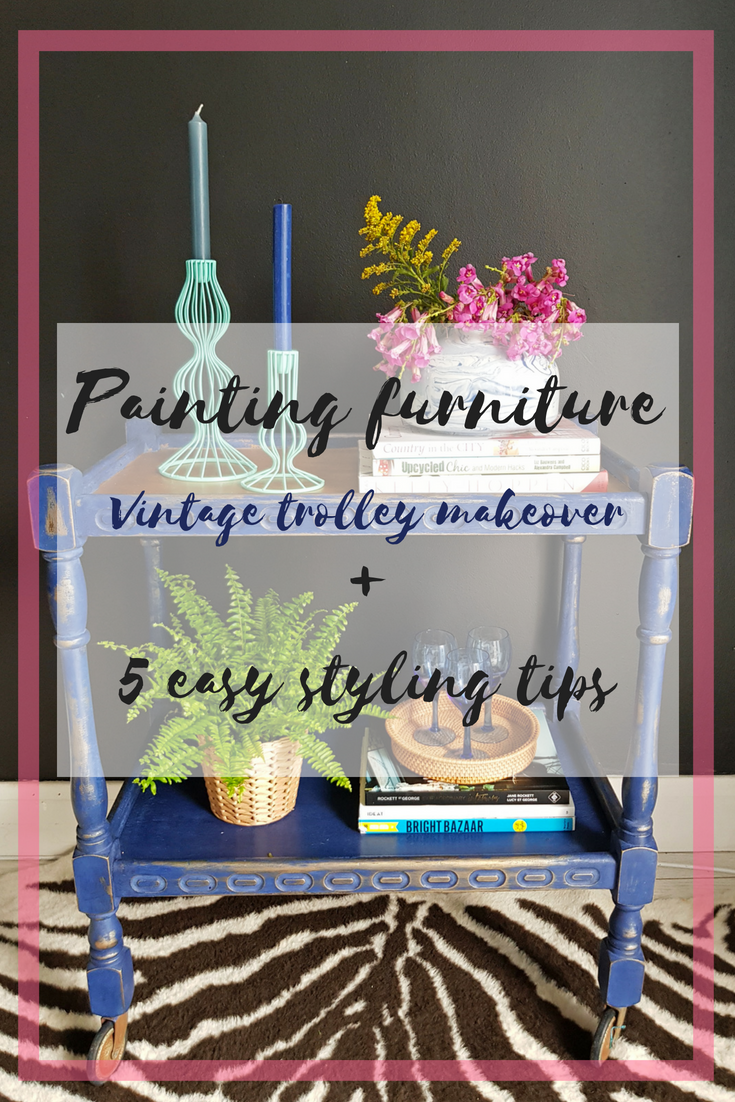
So here’s my latest painted furniture: my vintage trolley makeover
I know that distressing furniture is not as popular and on trend as it was few years ago. Probably I don’t use this technique as often as I used to but I still do it. So if you’re a fan of distressed painted furniture look you may want to stick to the end of this post.
Or if you want to know my styling tips, you may want to stick to the end too…
But first, the vintage trolley before…
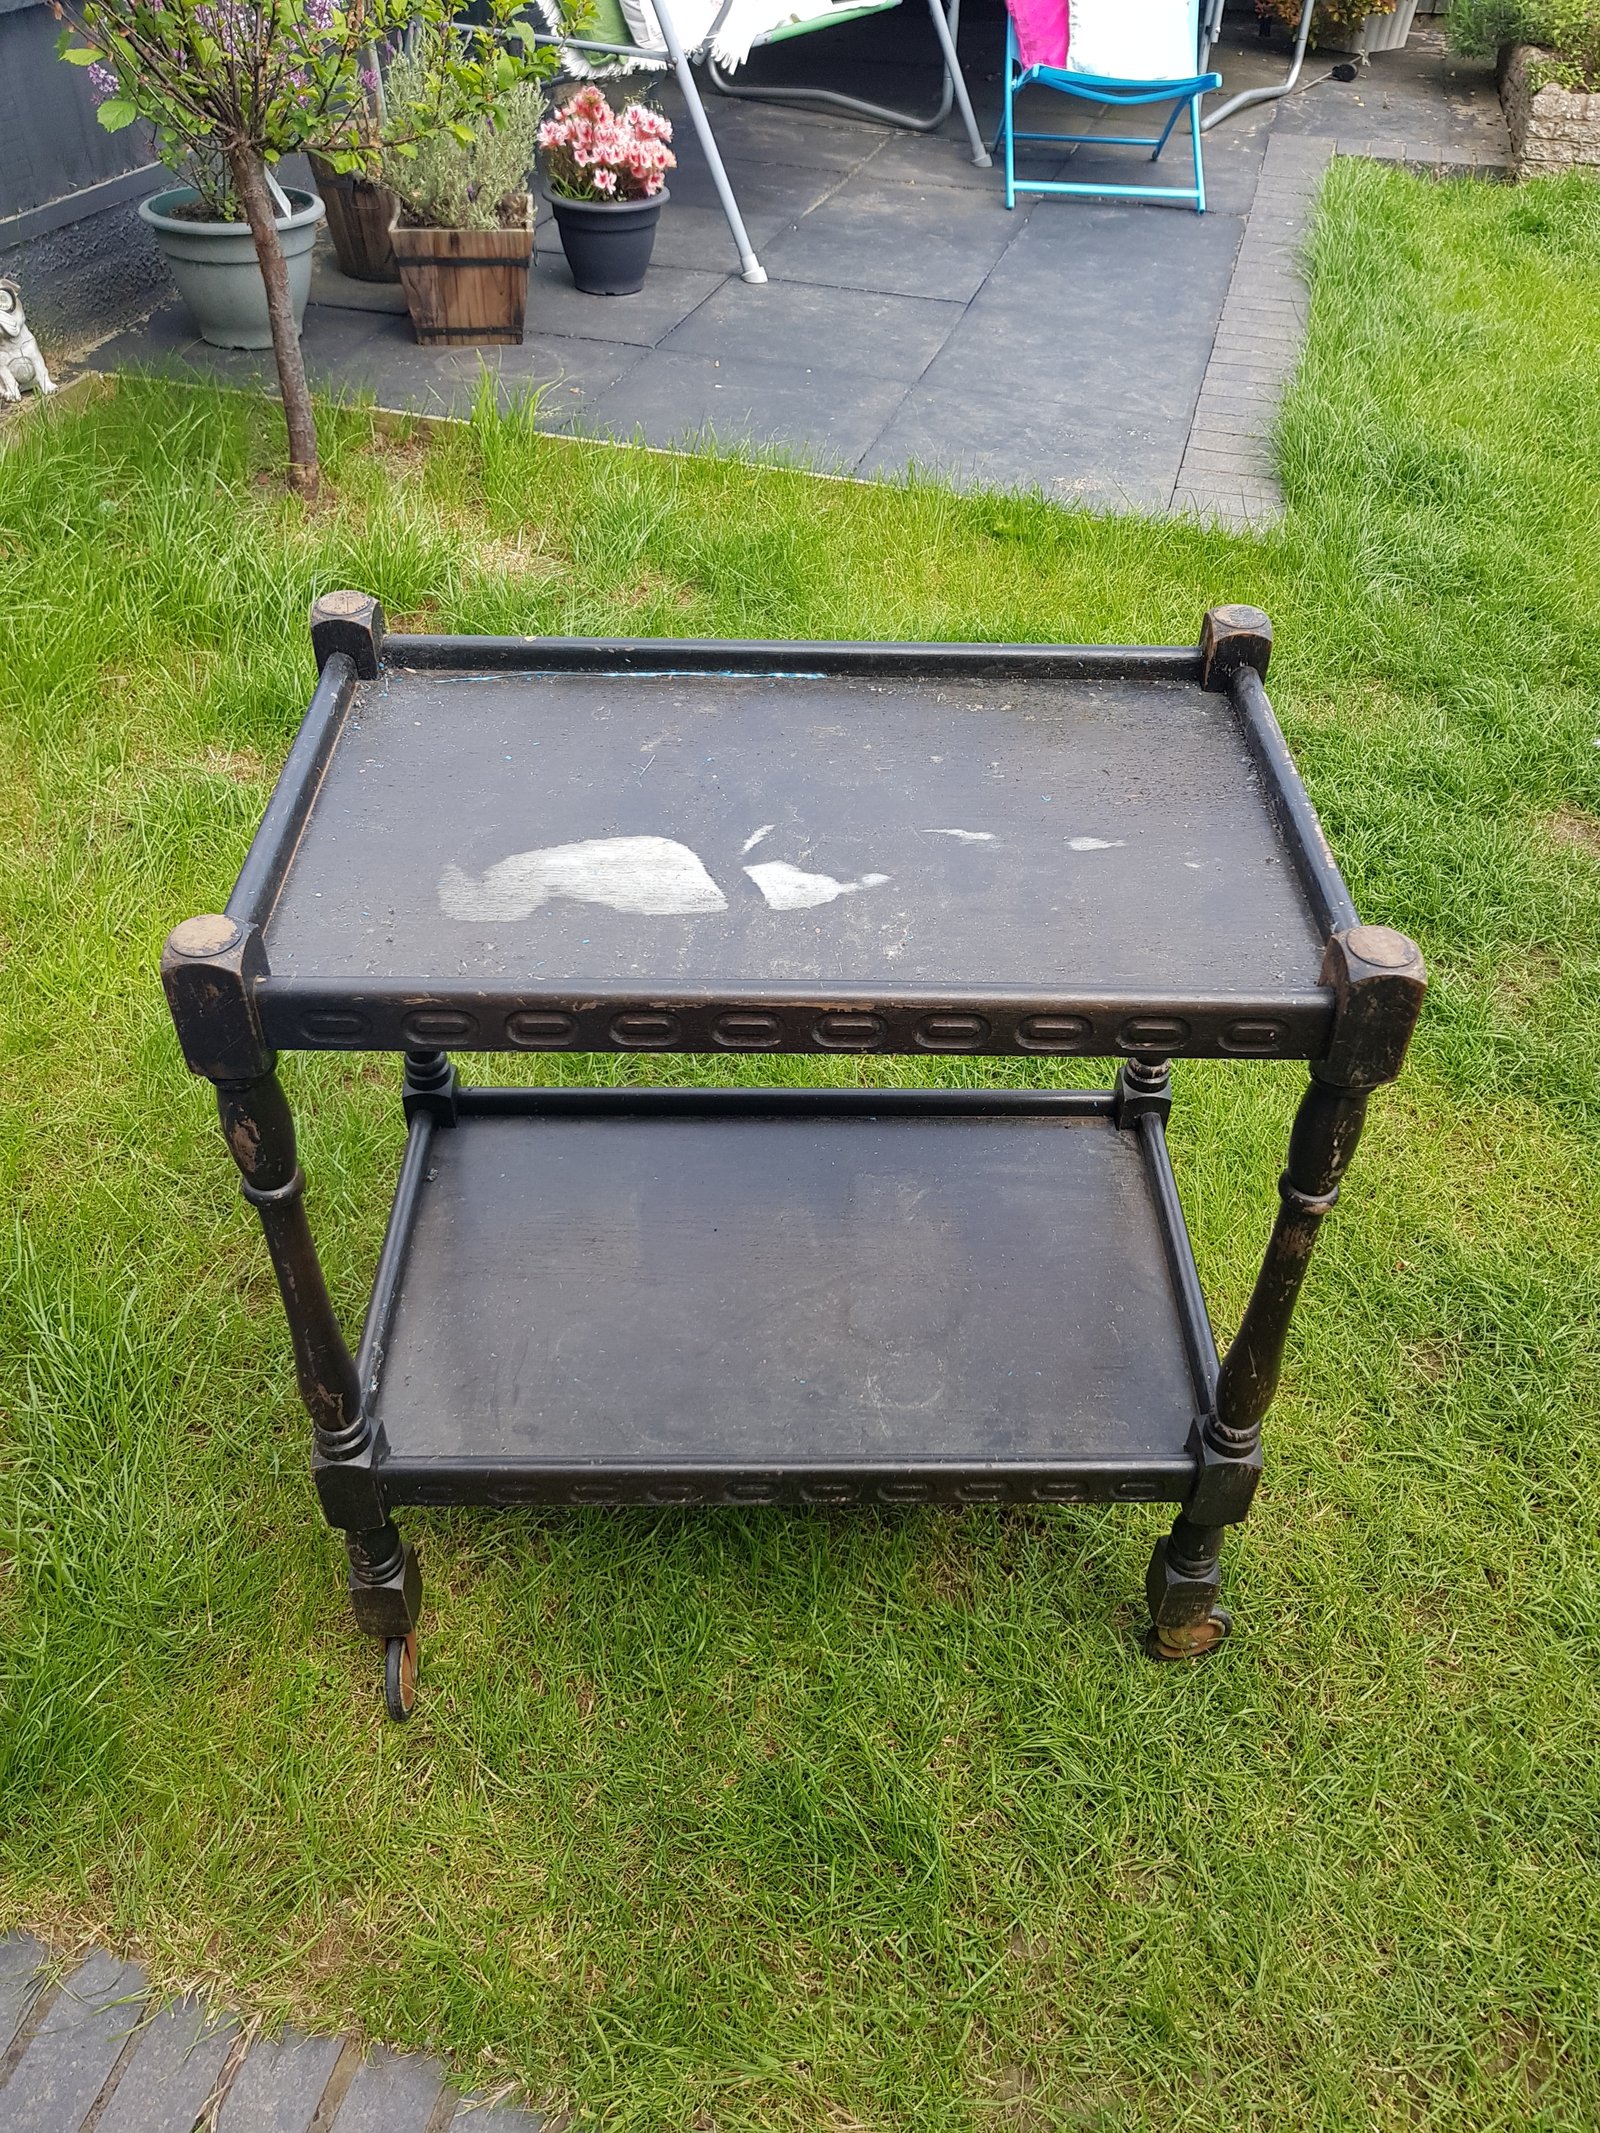
I’ve found the trolley on Ebay and paid £10 for it. It was in a bit of a state but I knew it would make a great simple DIY project. (Although it took me nearly 5 months to finally got round it)
So first of all, the trolley needed a good old clean and a bit of a sanding down treatment to get rid of the old flaky paint.
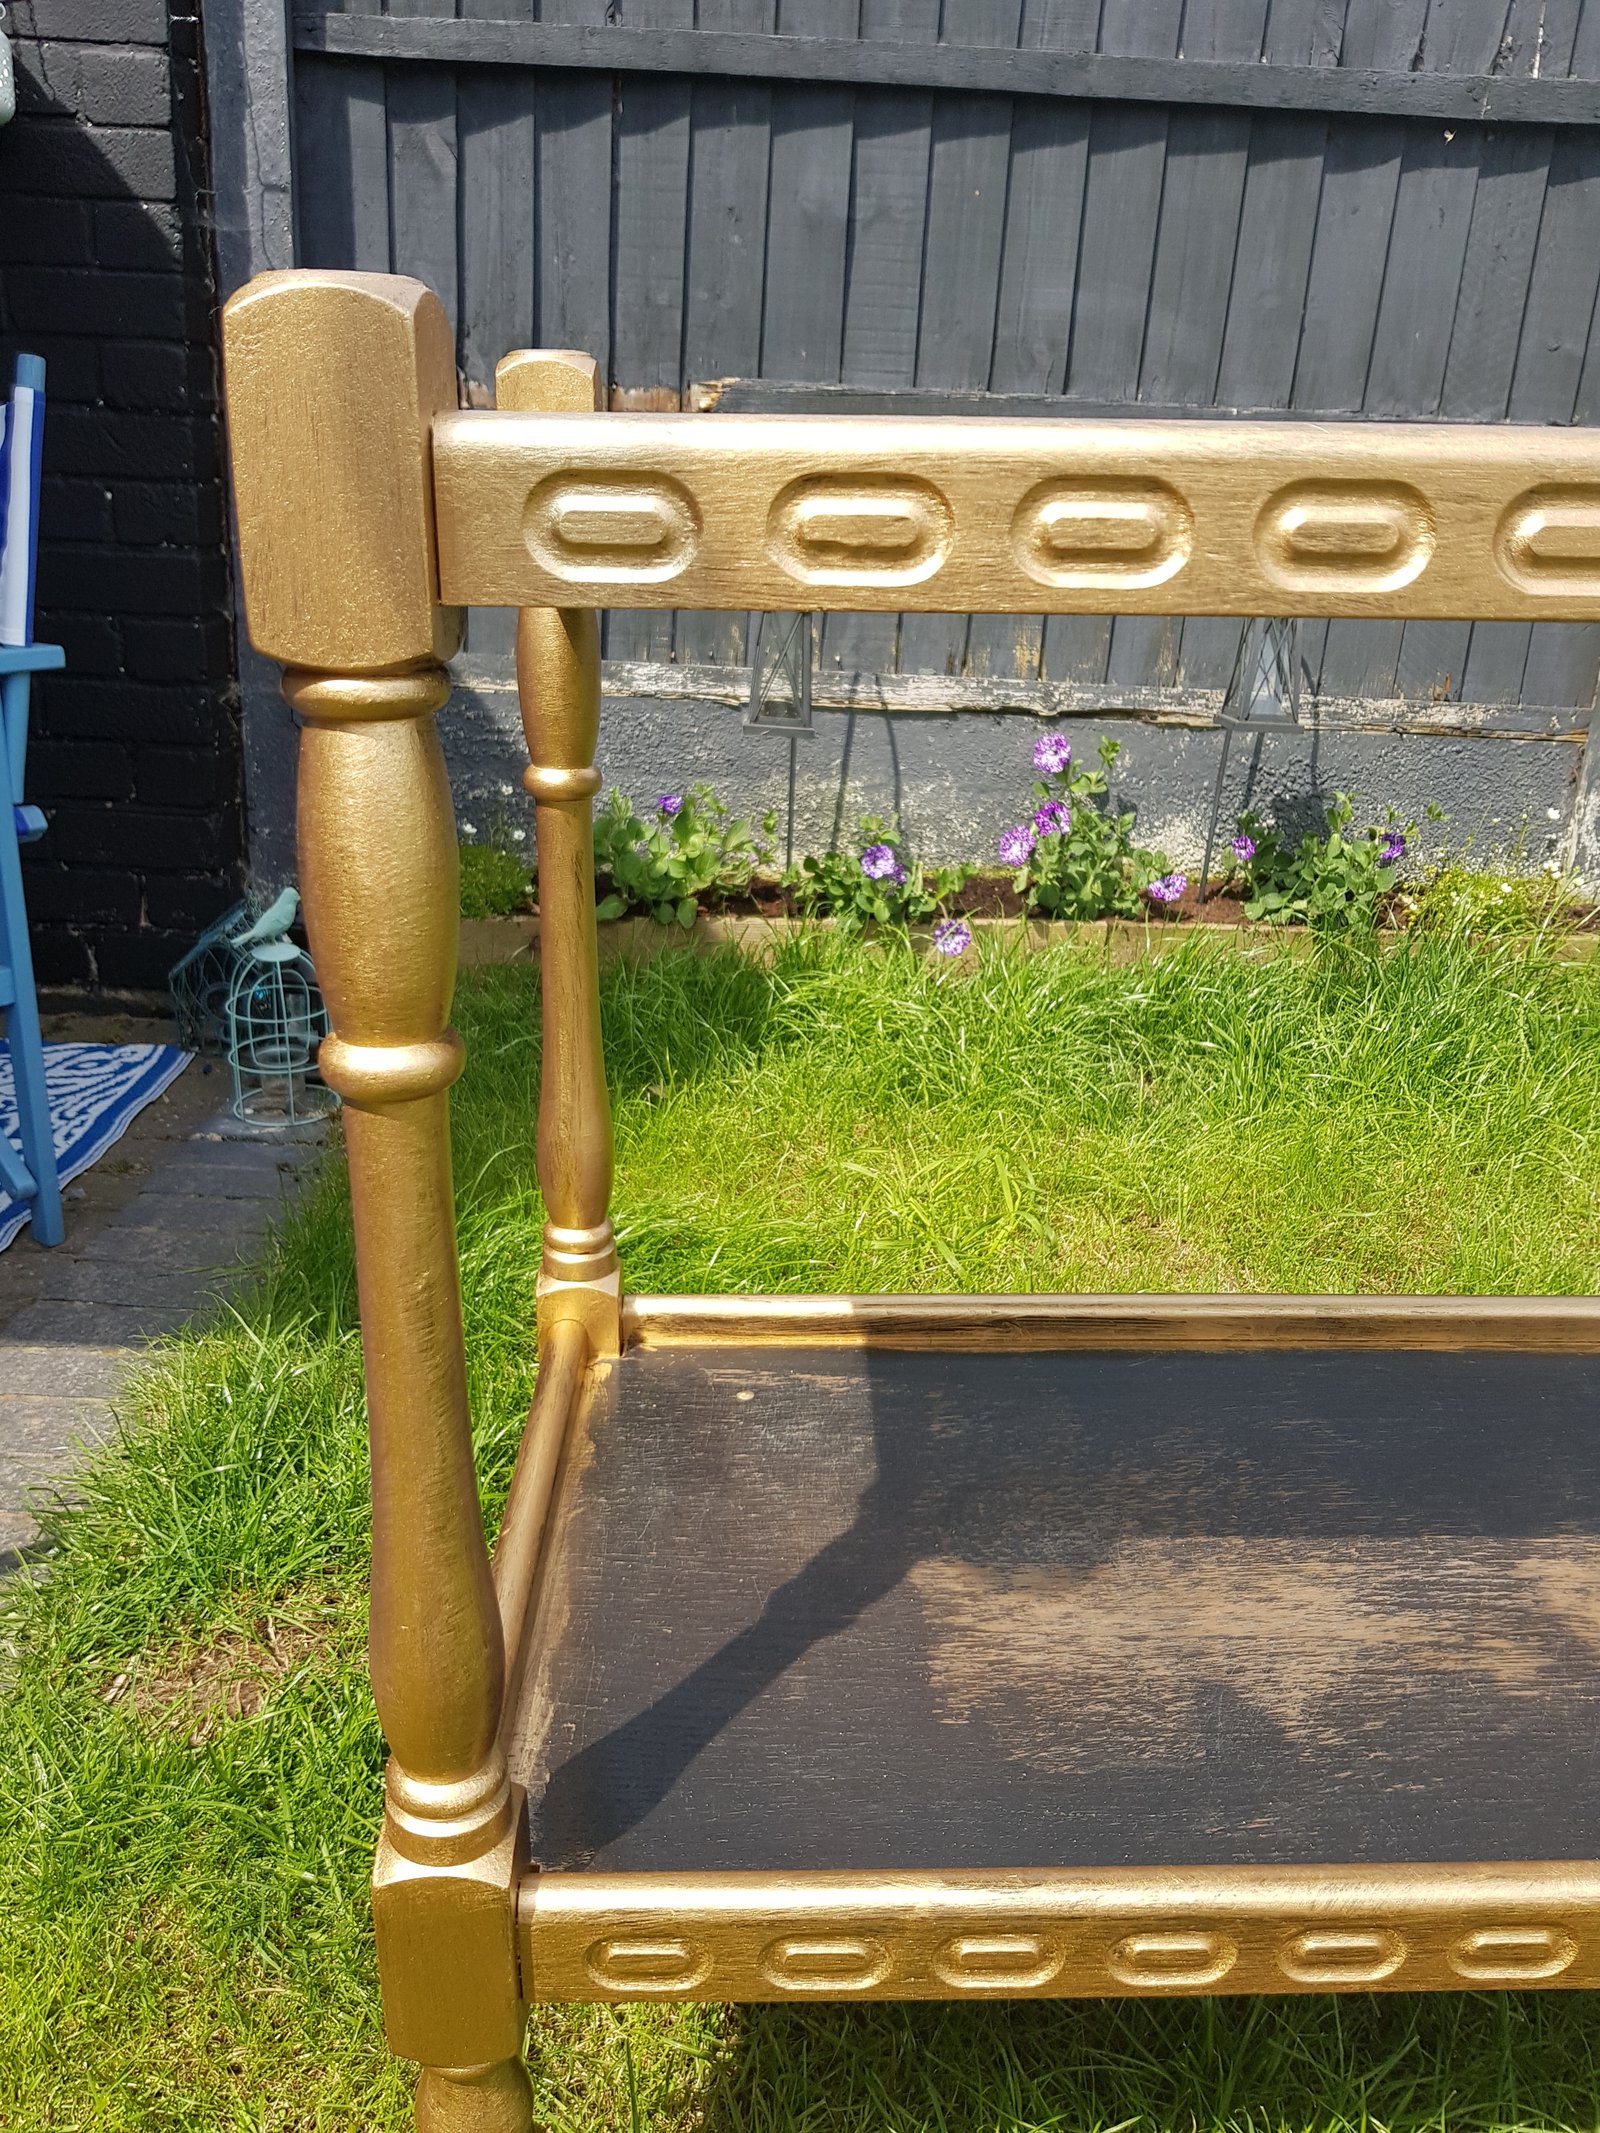
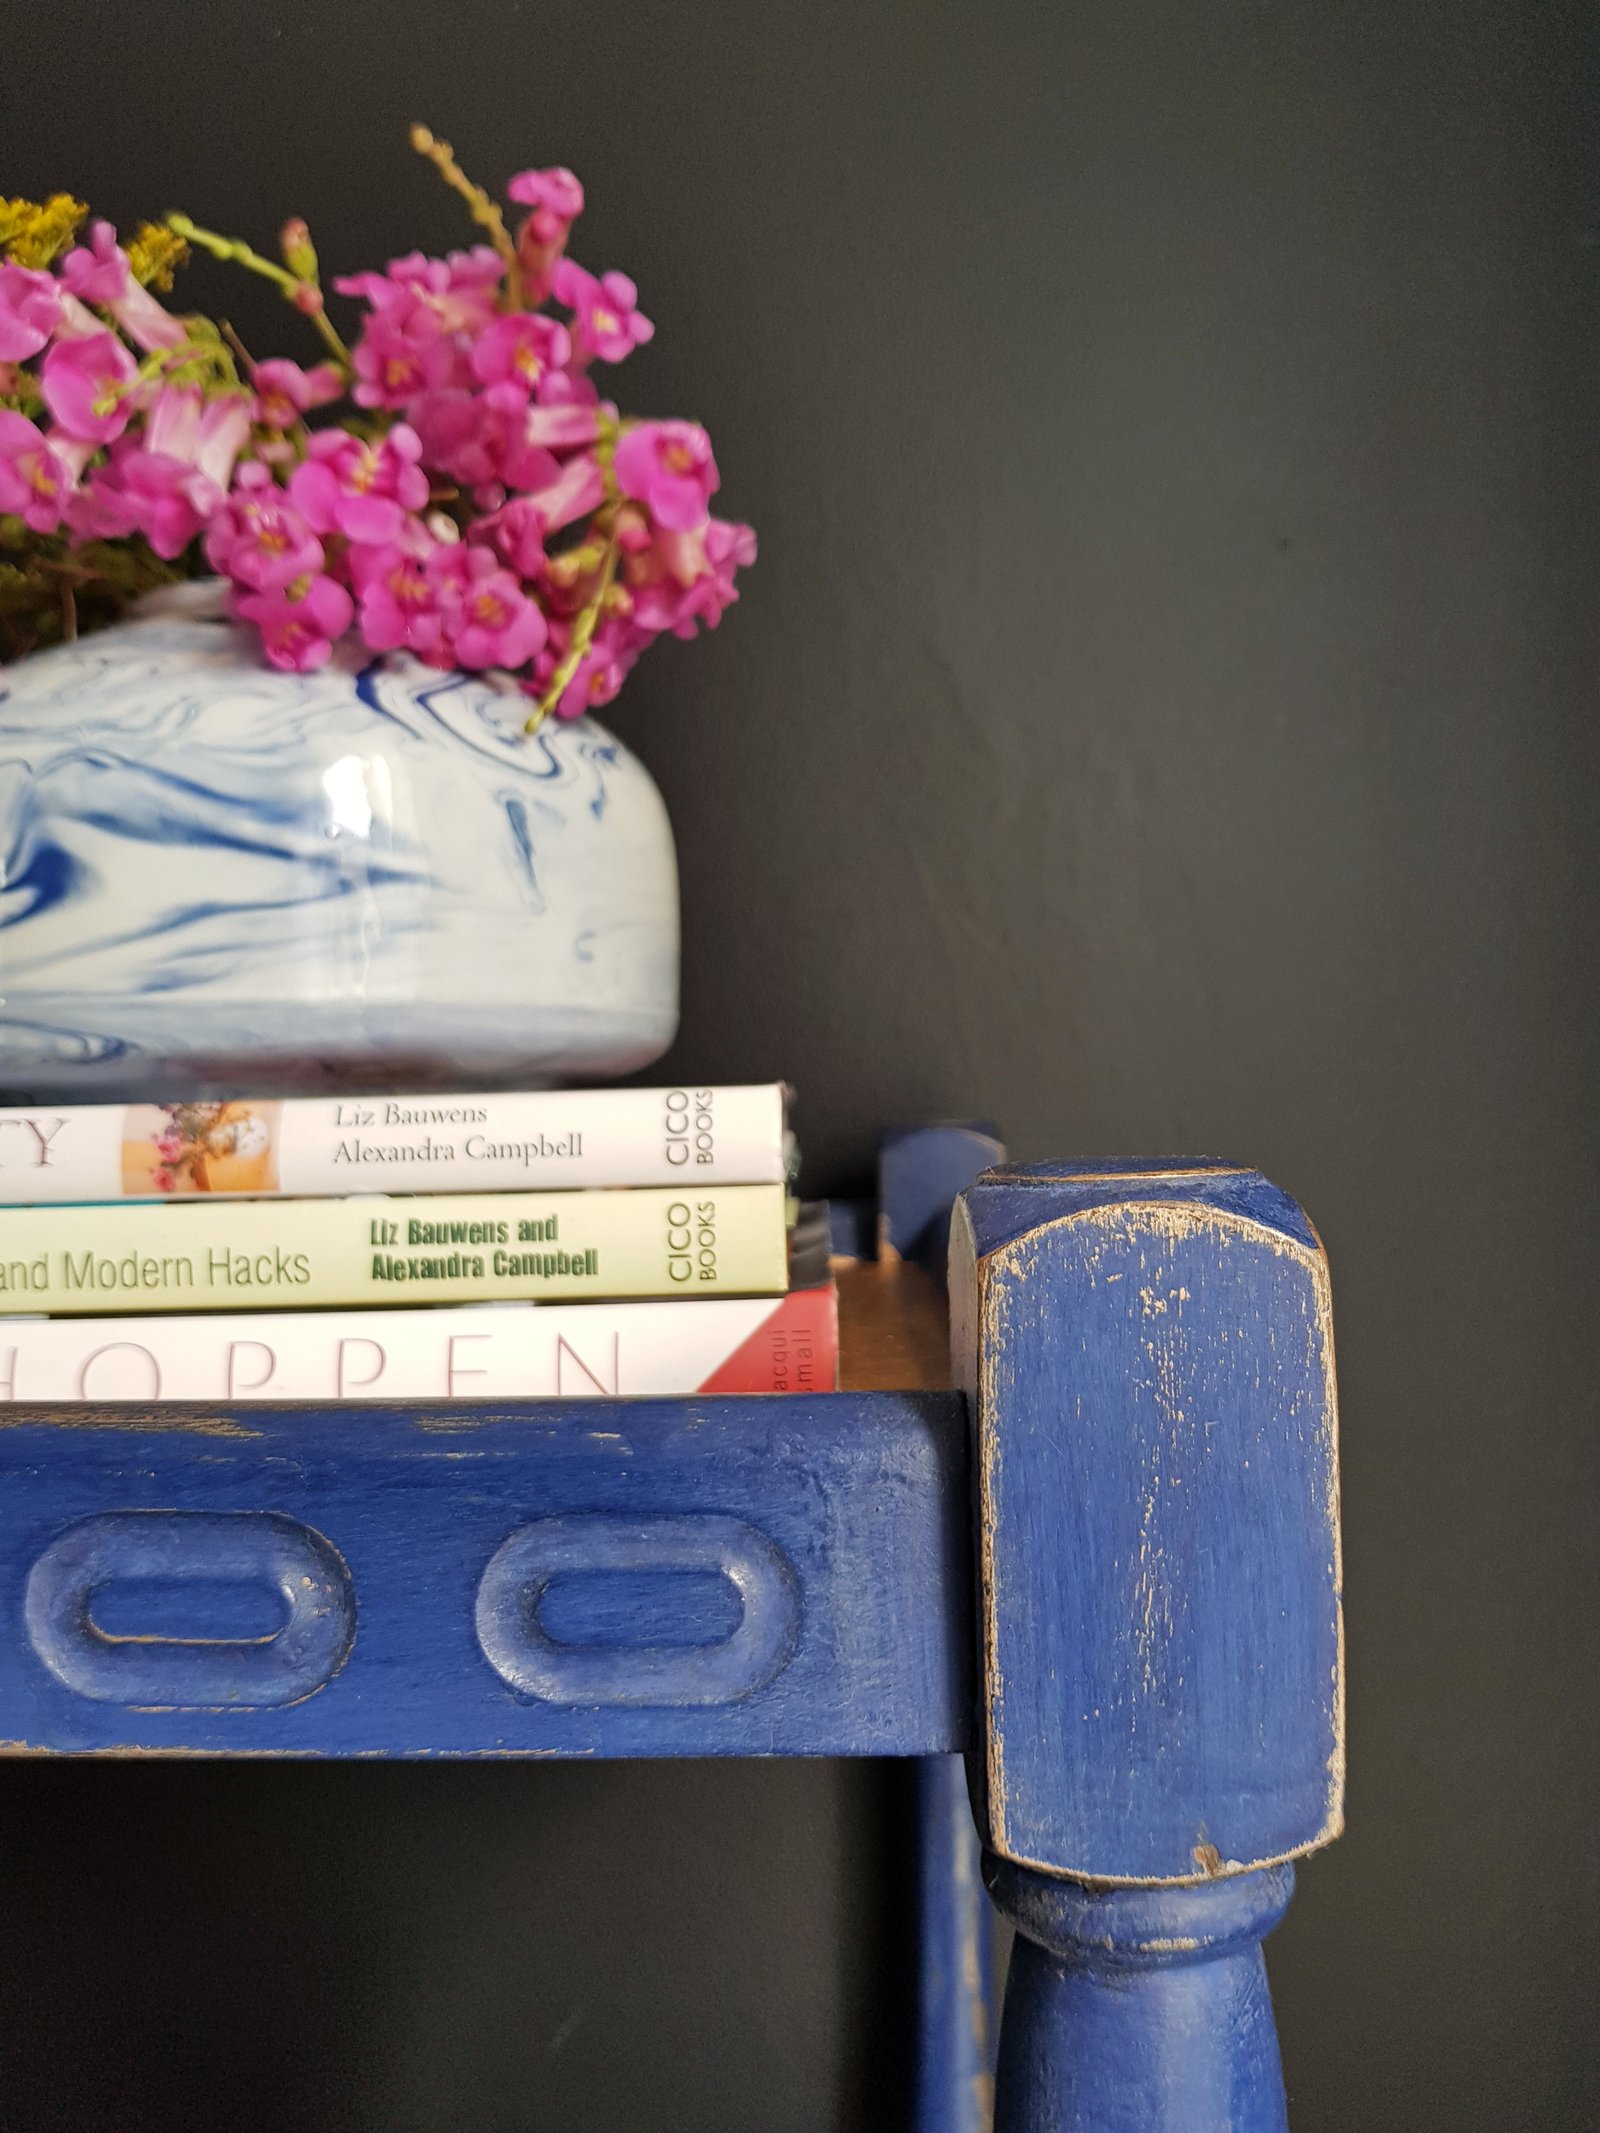
Then I started by applying the metallic gold paint (try this one) to the sides of the trolley. The initial plan was to have the gold only in those distressed places coming through. But I quickly realised that this gold paint is simply to good to be left almost invisible. So I decided to paint the top of the trolley gold too. And I’m glad I did! This change of plan has made all the difference. So my advise to you is to ALWAYS STAY OPEN MINDED! Even if you think you have a plan it’s good to be open to new ideas that pop in your head along the way. And that especially relates to all your home DIY projects!

What’s next?
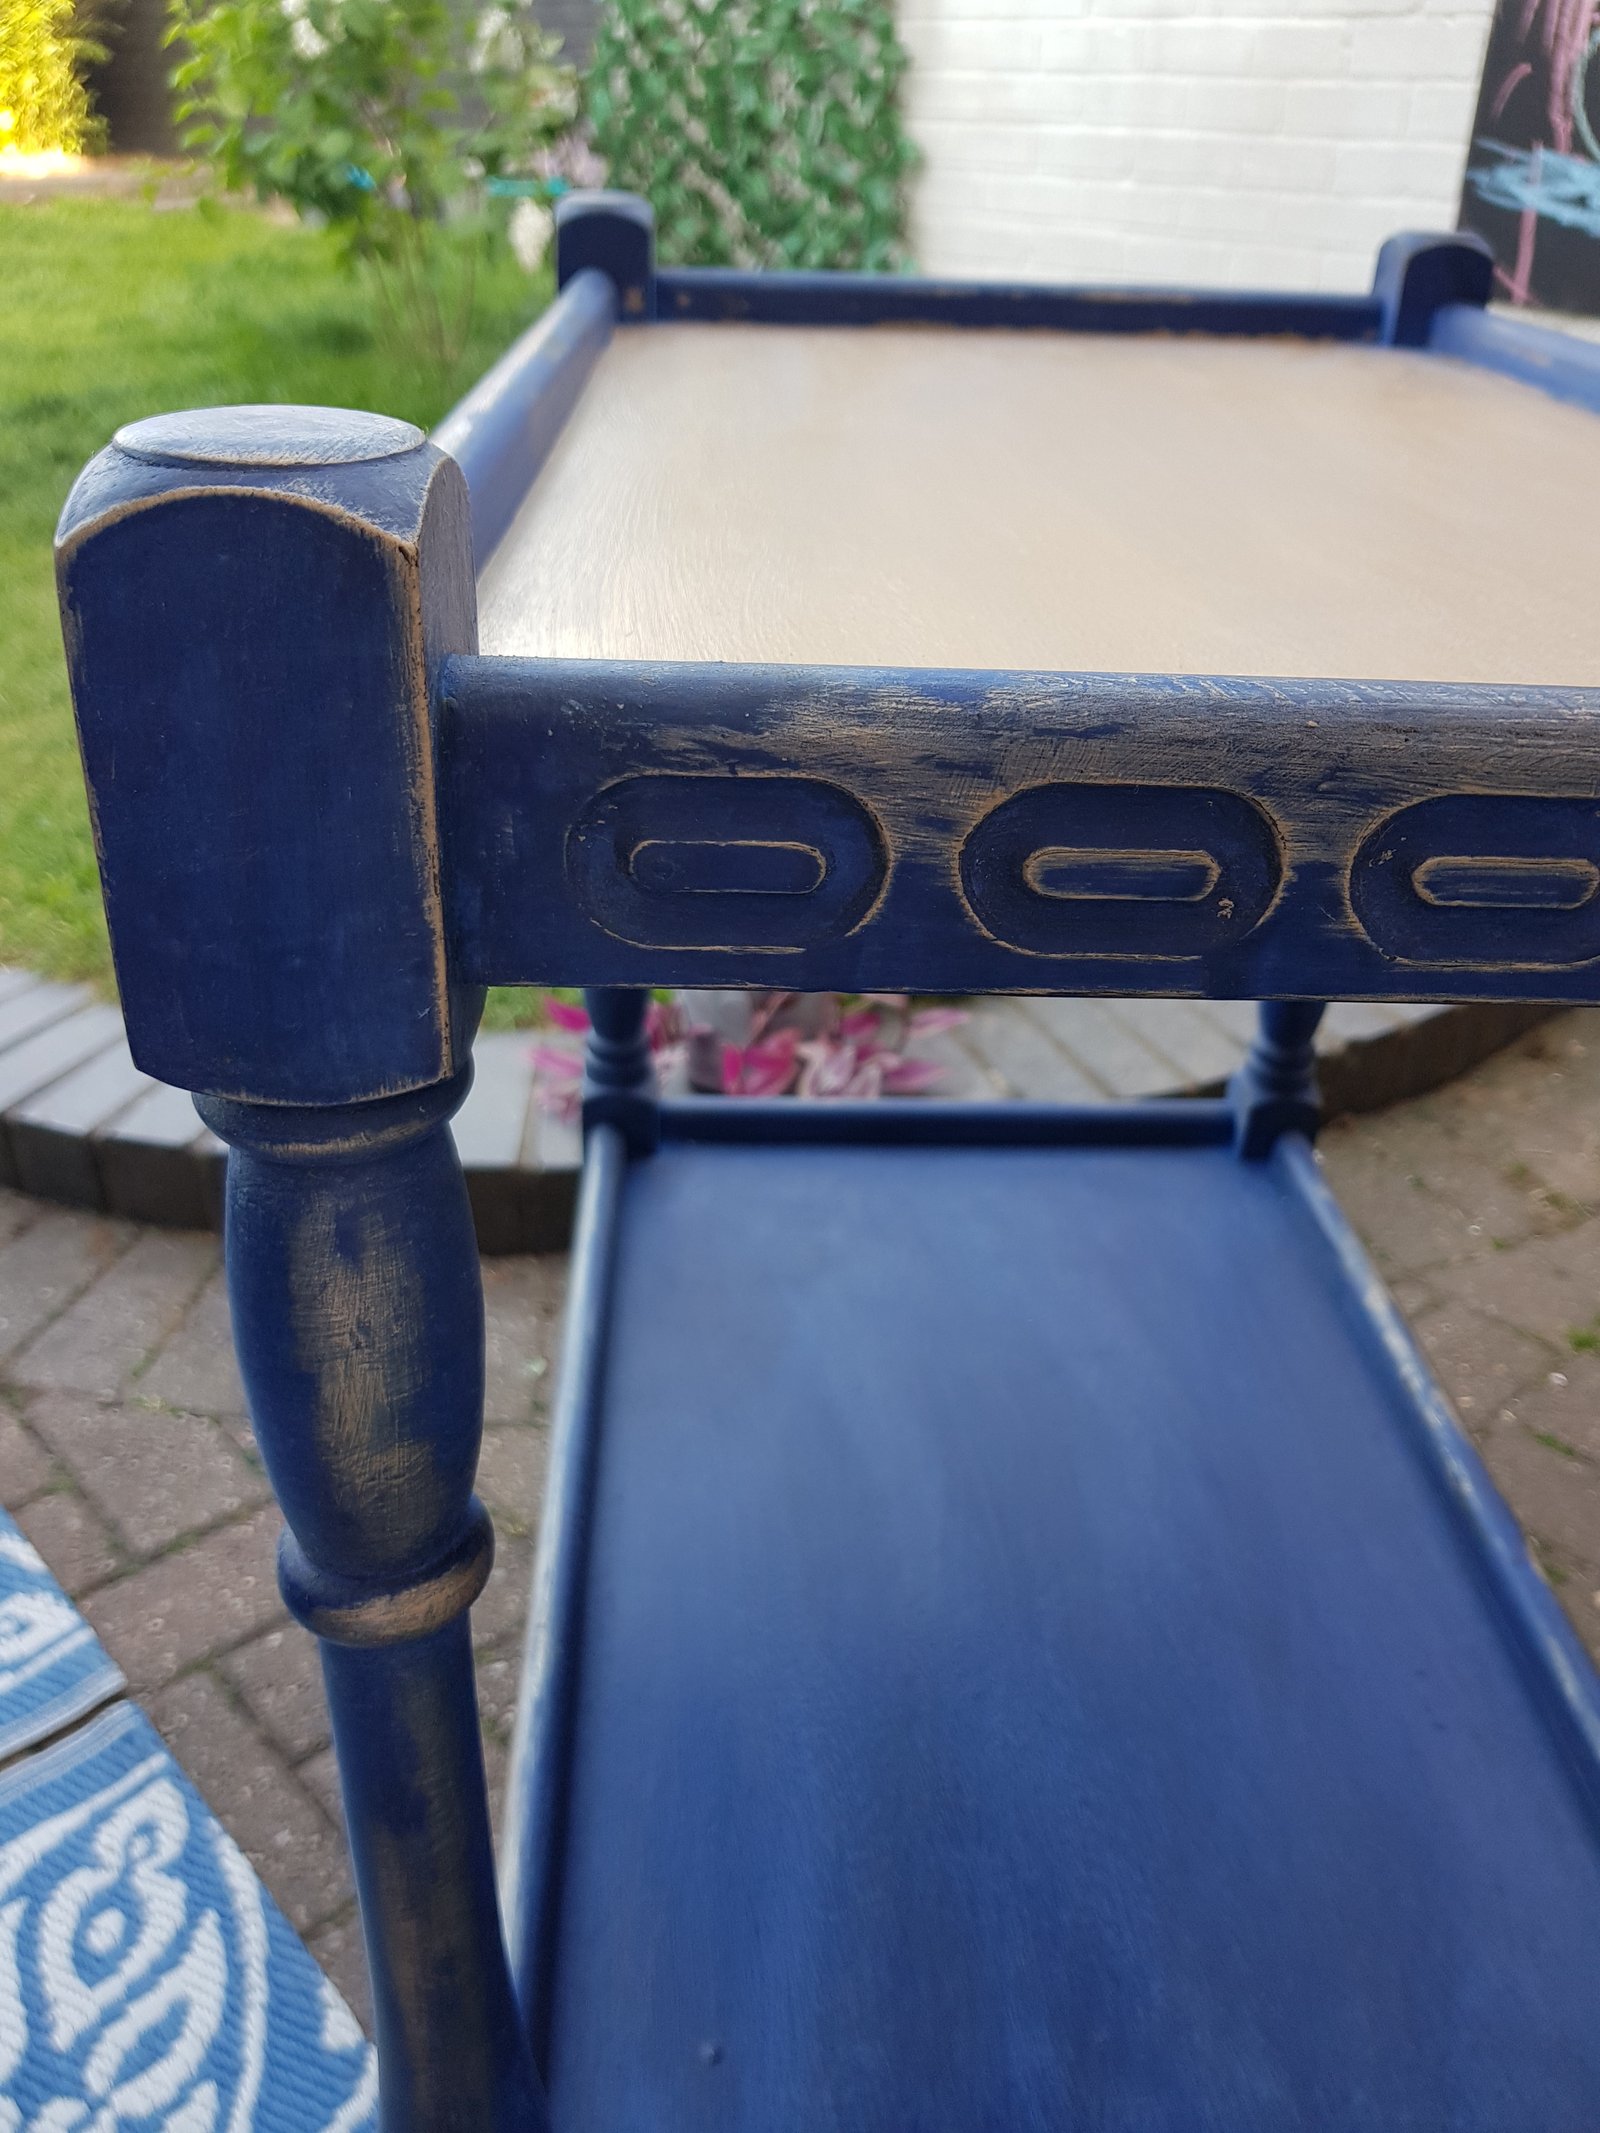
And then it was time to use my favourite colour – Napoleonic Blue by Annie Sloan. If you’ve been following my Instagram account for a while or if you read my post in the past, then I’m sure you know that I’m a big fan of blue colour… In fact I’m a little bit blue crazy! So of course I had to paint my vintage trolley in yet another shade of blue. (Yep, there are fifty shades of this colour in my house… But don’t try to read too much into it. Similarities end here… even though I wished otherwise)
Back to the trolley. The blue paint went on and the gold disappeared. But not for long though as after some light sanding down the gold started to reappear again. And what happened with the blue?


After I finished distressing the trolley I used some clear wax for protection.
Always remember to wax your painted furniture! It not only protects them from bumps and scratches , but gives some depth to your furniture too.


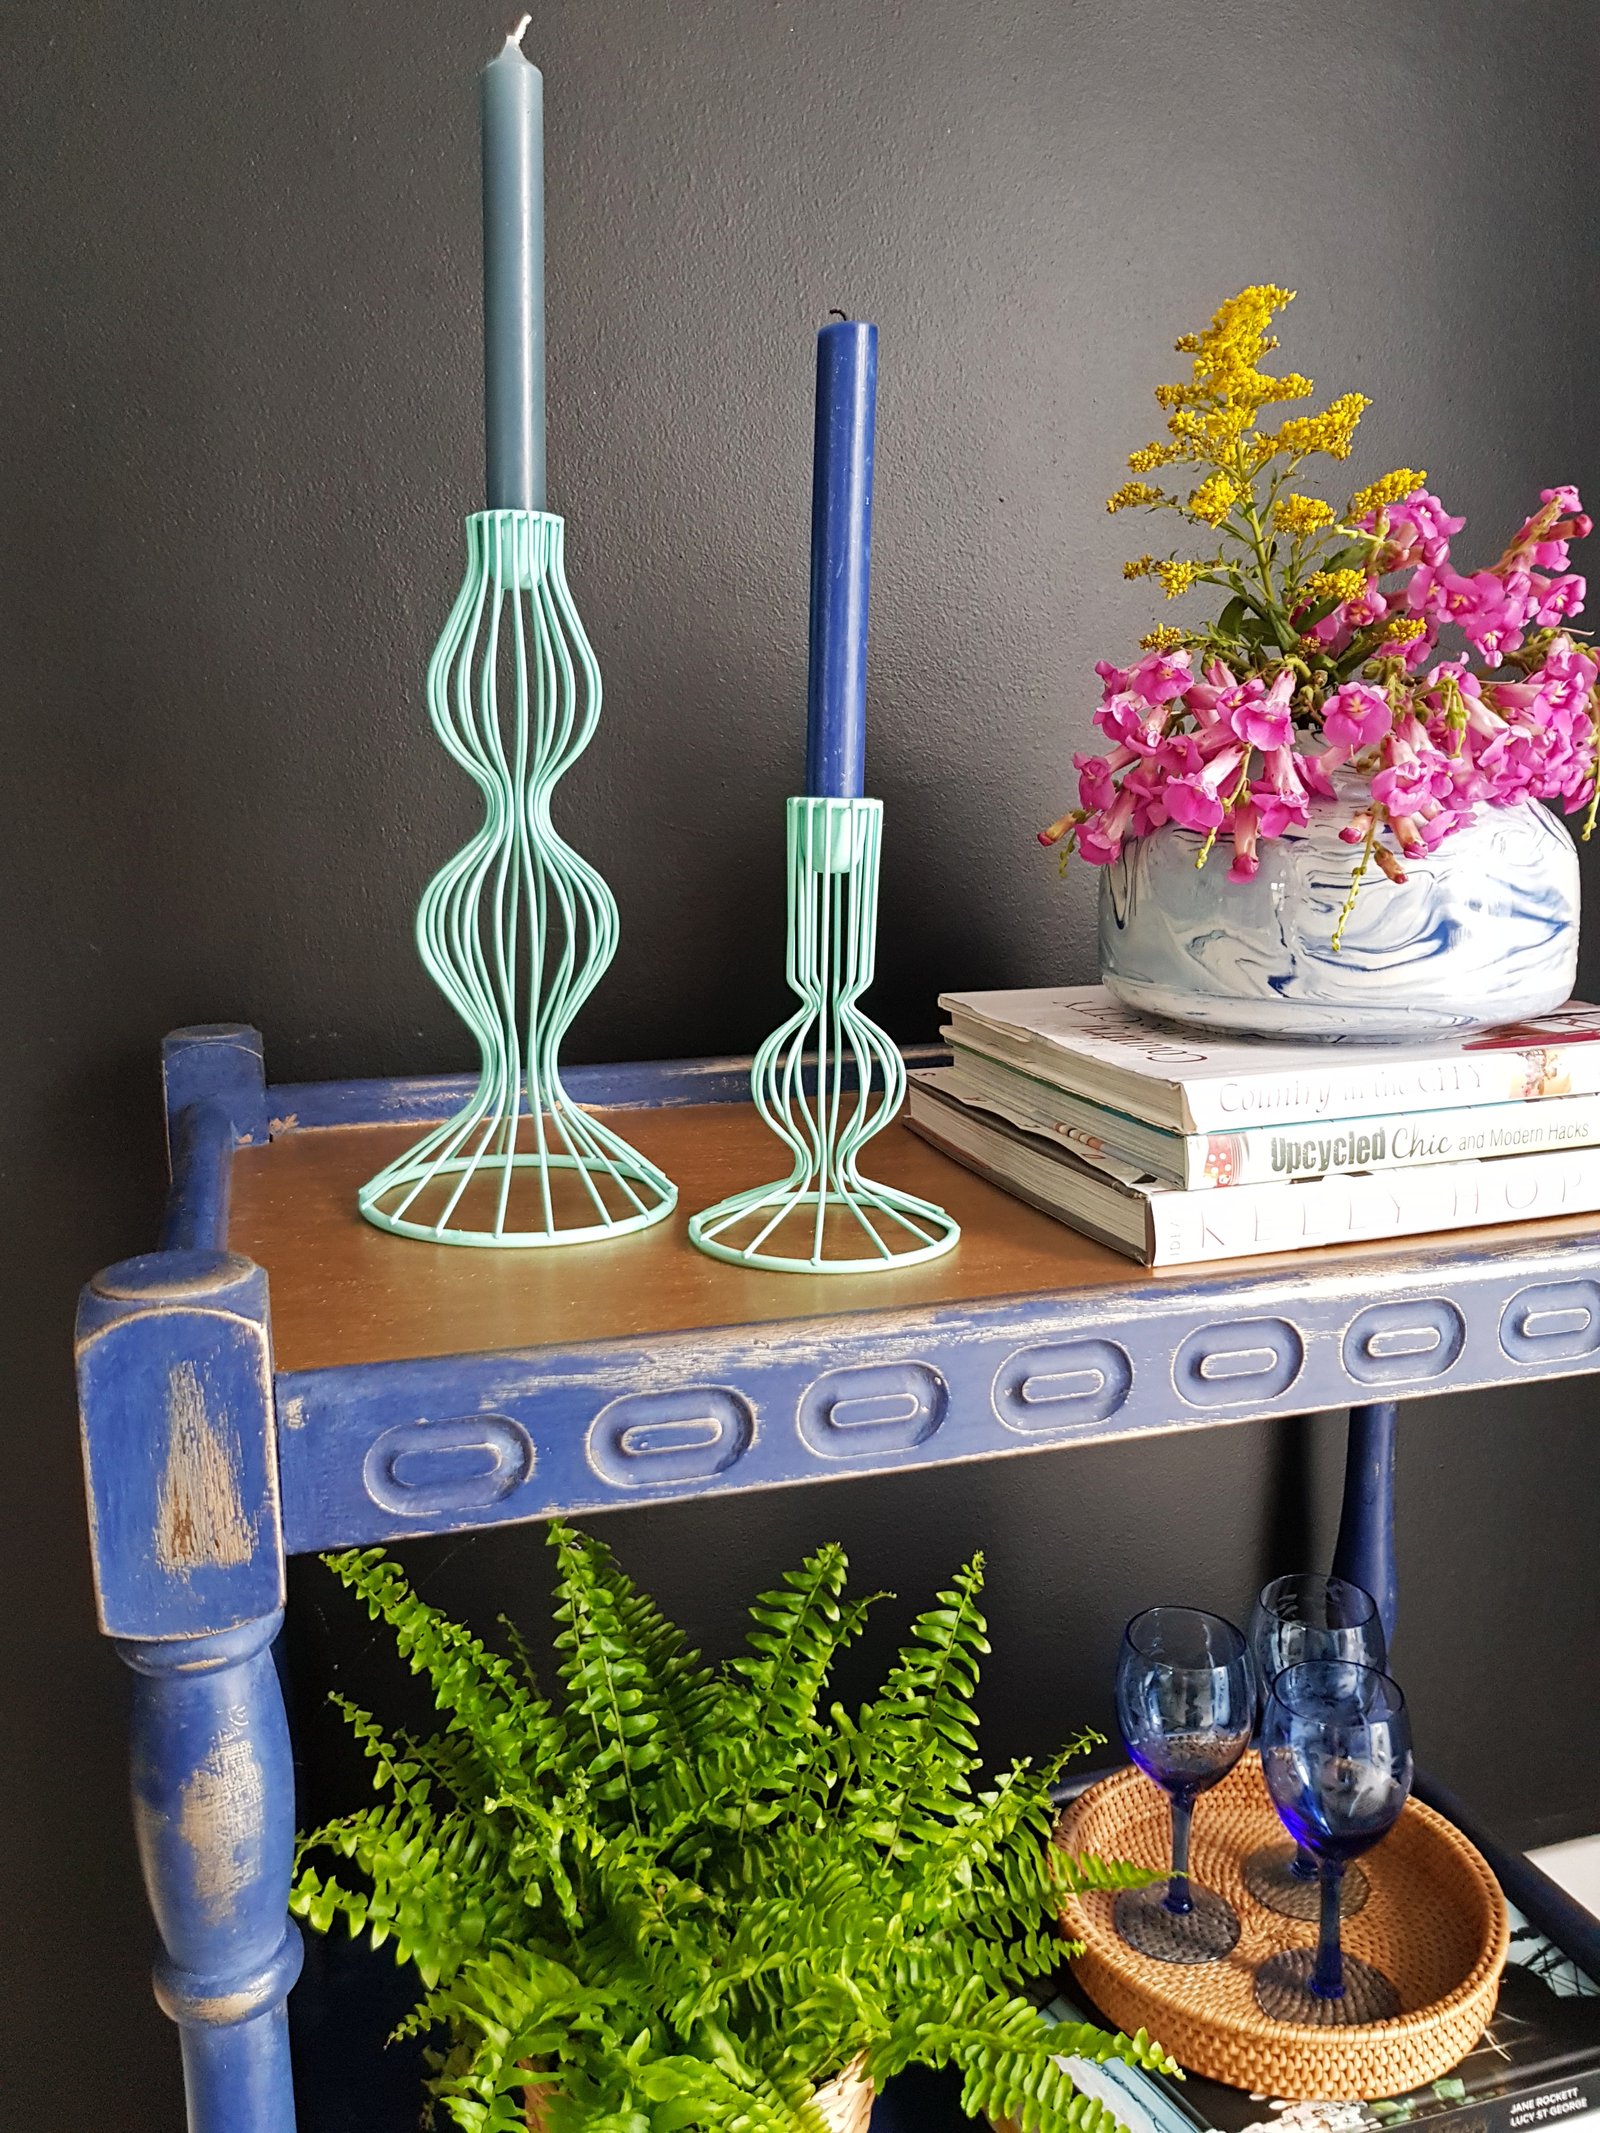
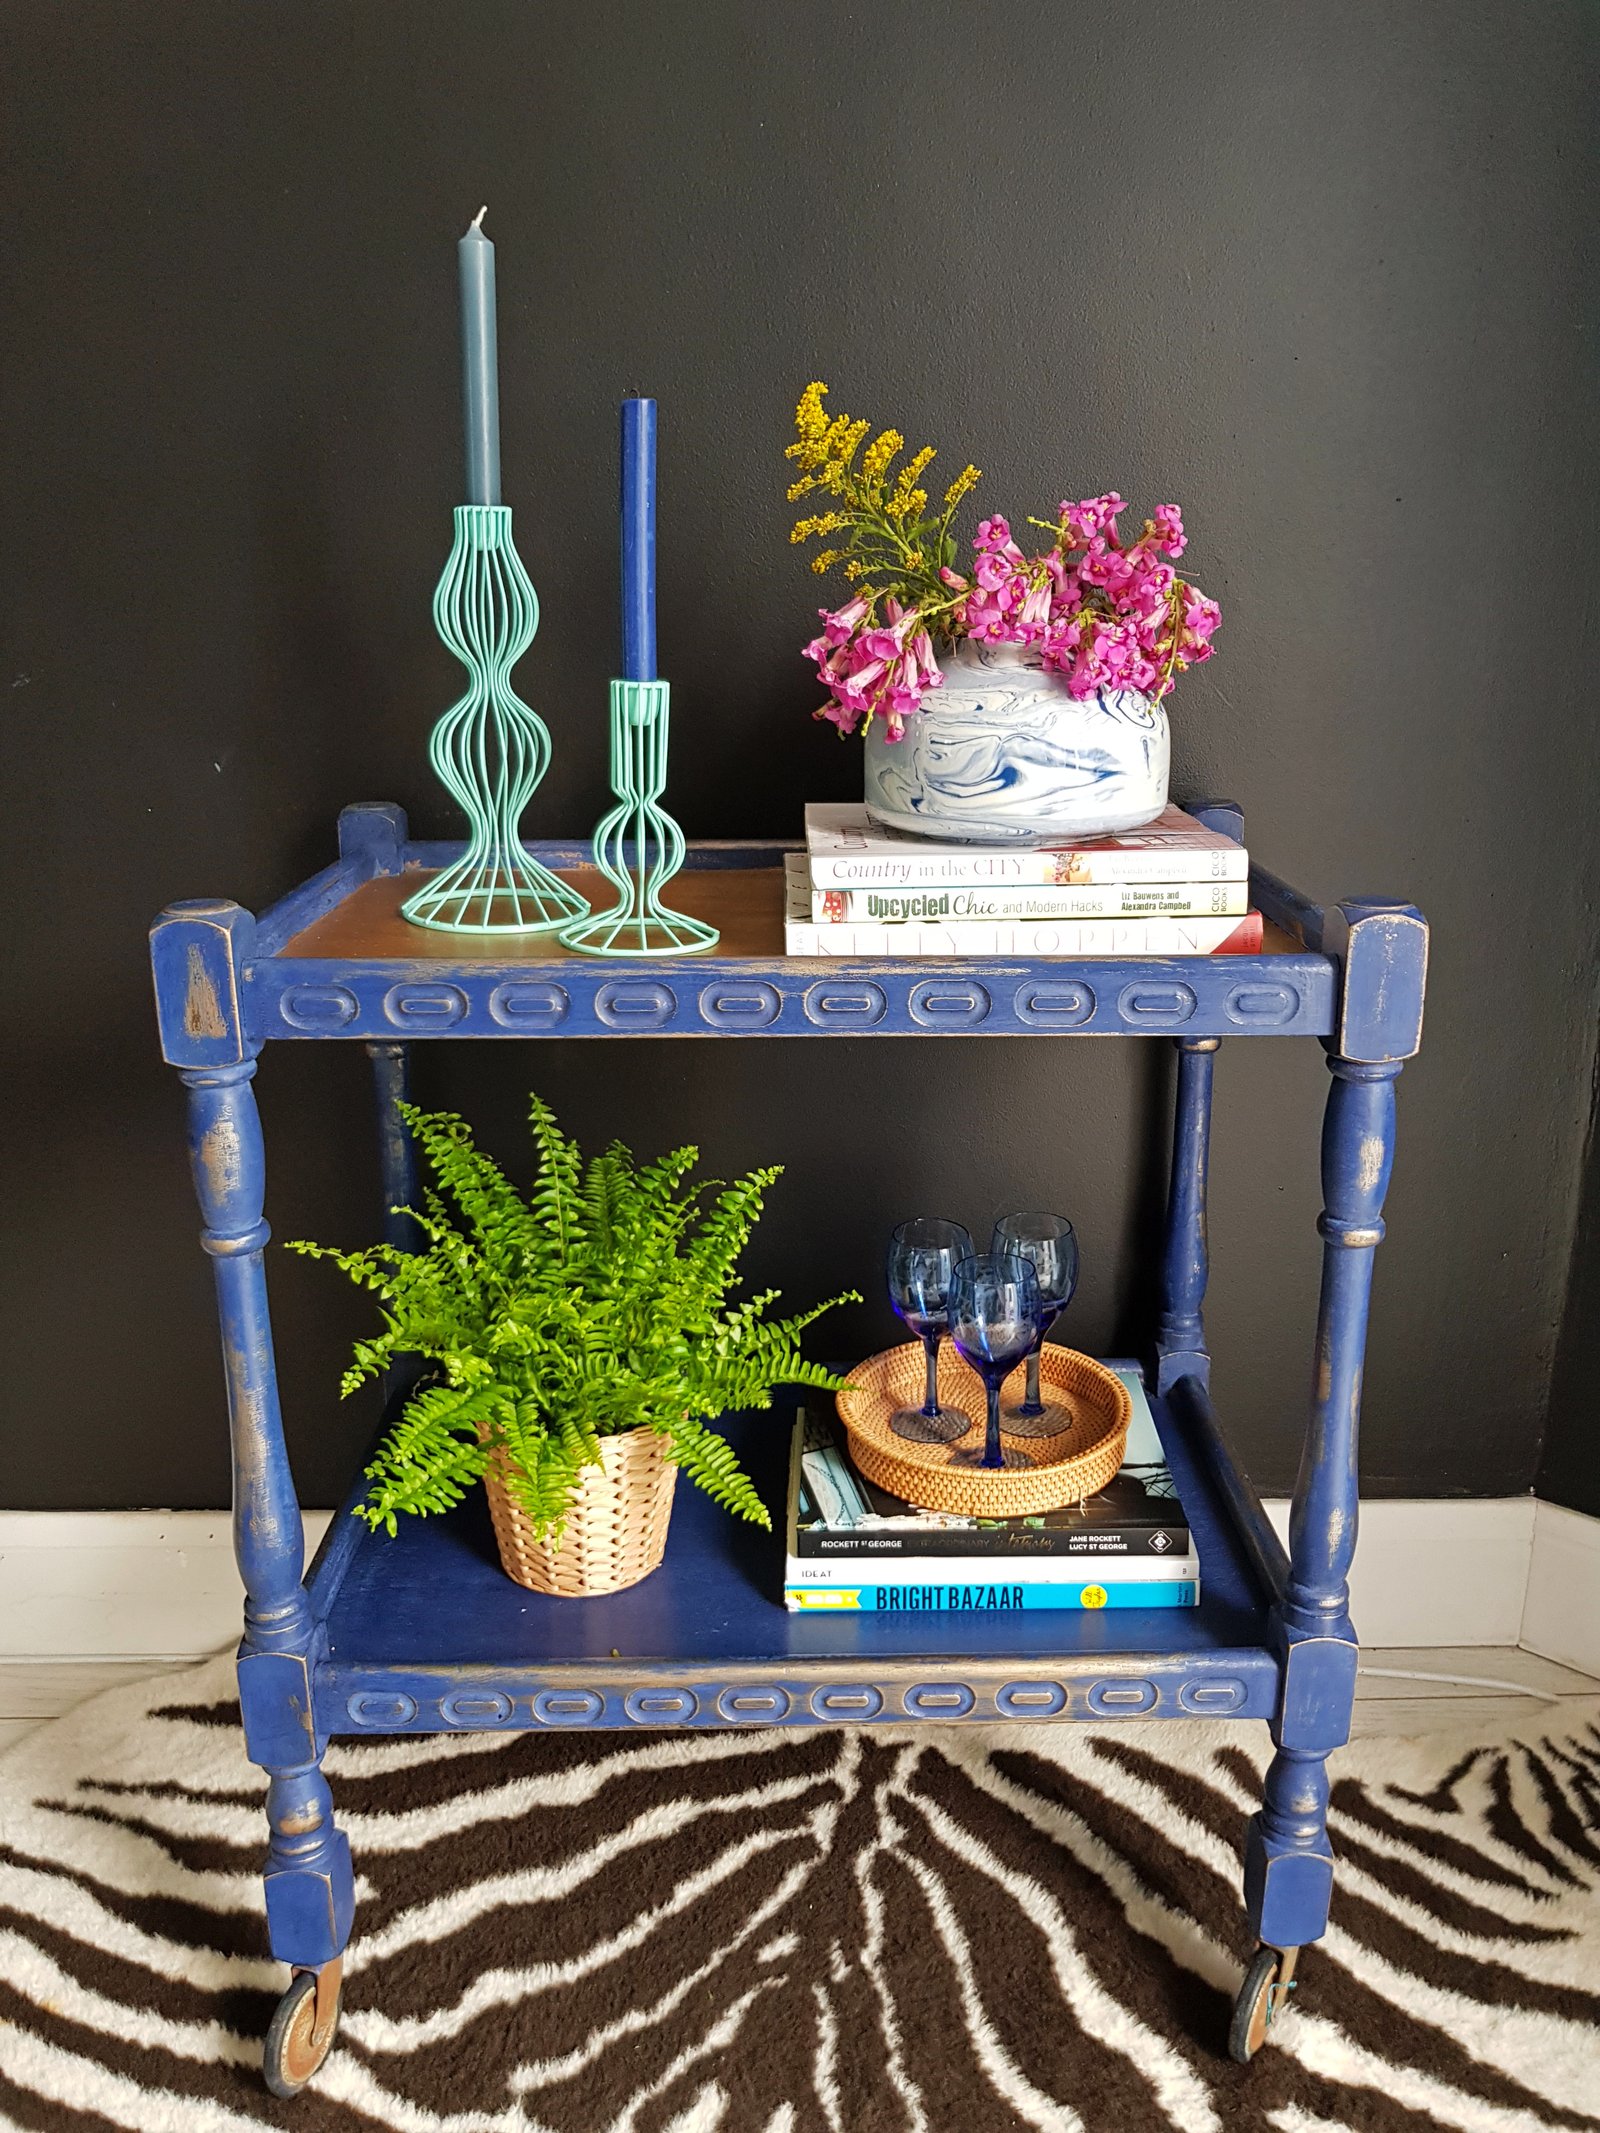
And here’s the final look of my vintage trolley makeover. I still need to change the castors as they are old and rusted but apart from that I’m pretty happy with this little transformation!

And now a little bonus for your newly painted furniture:
5 EASY TO FOLLOW STYLING TIPS!
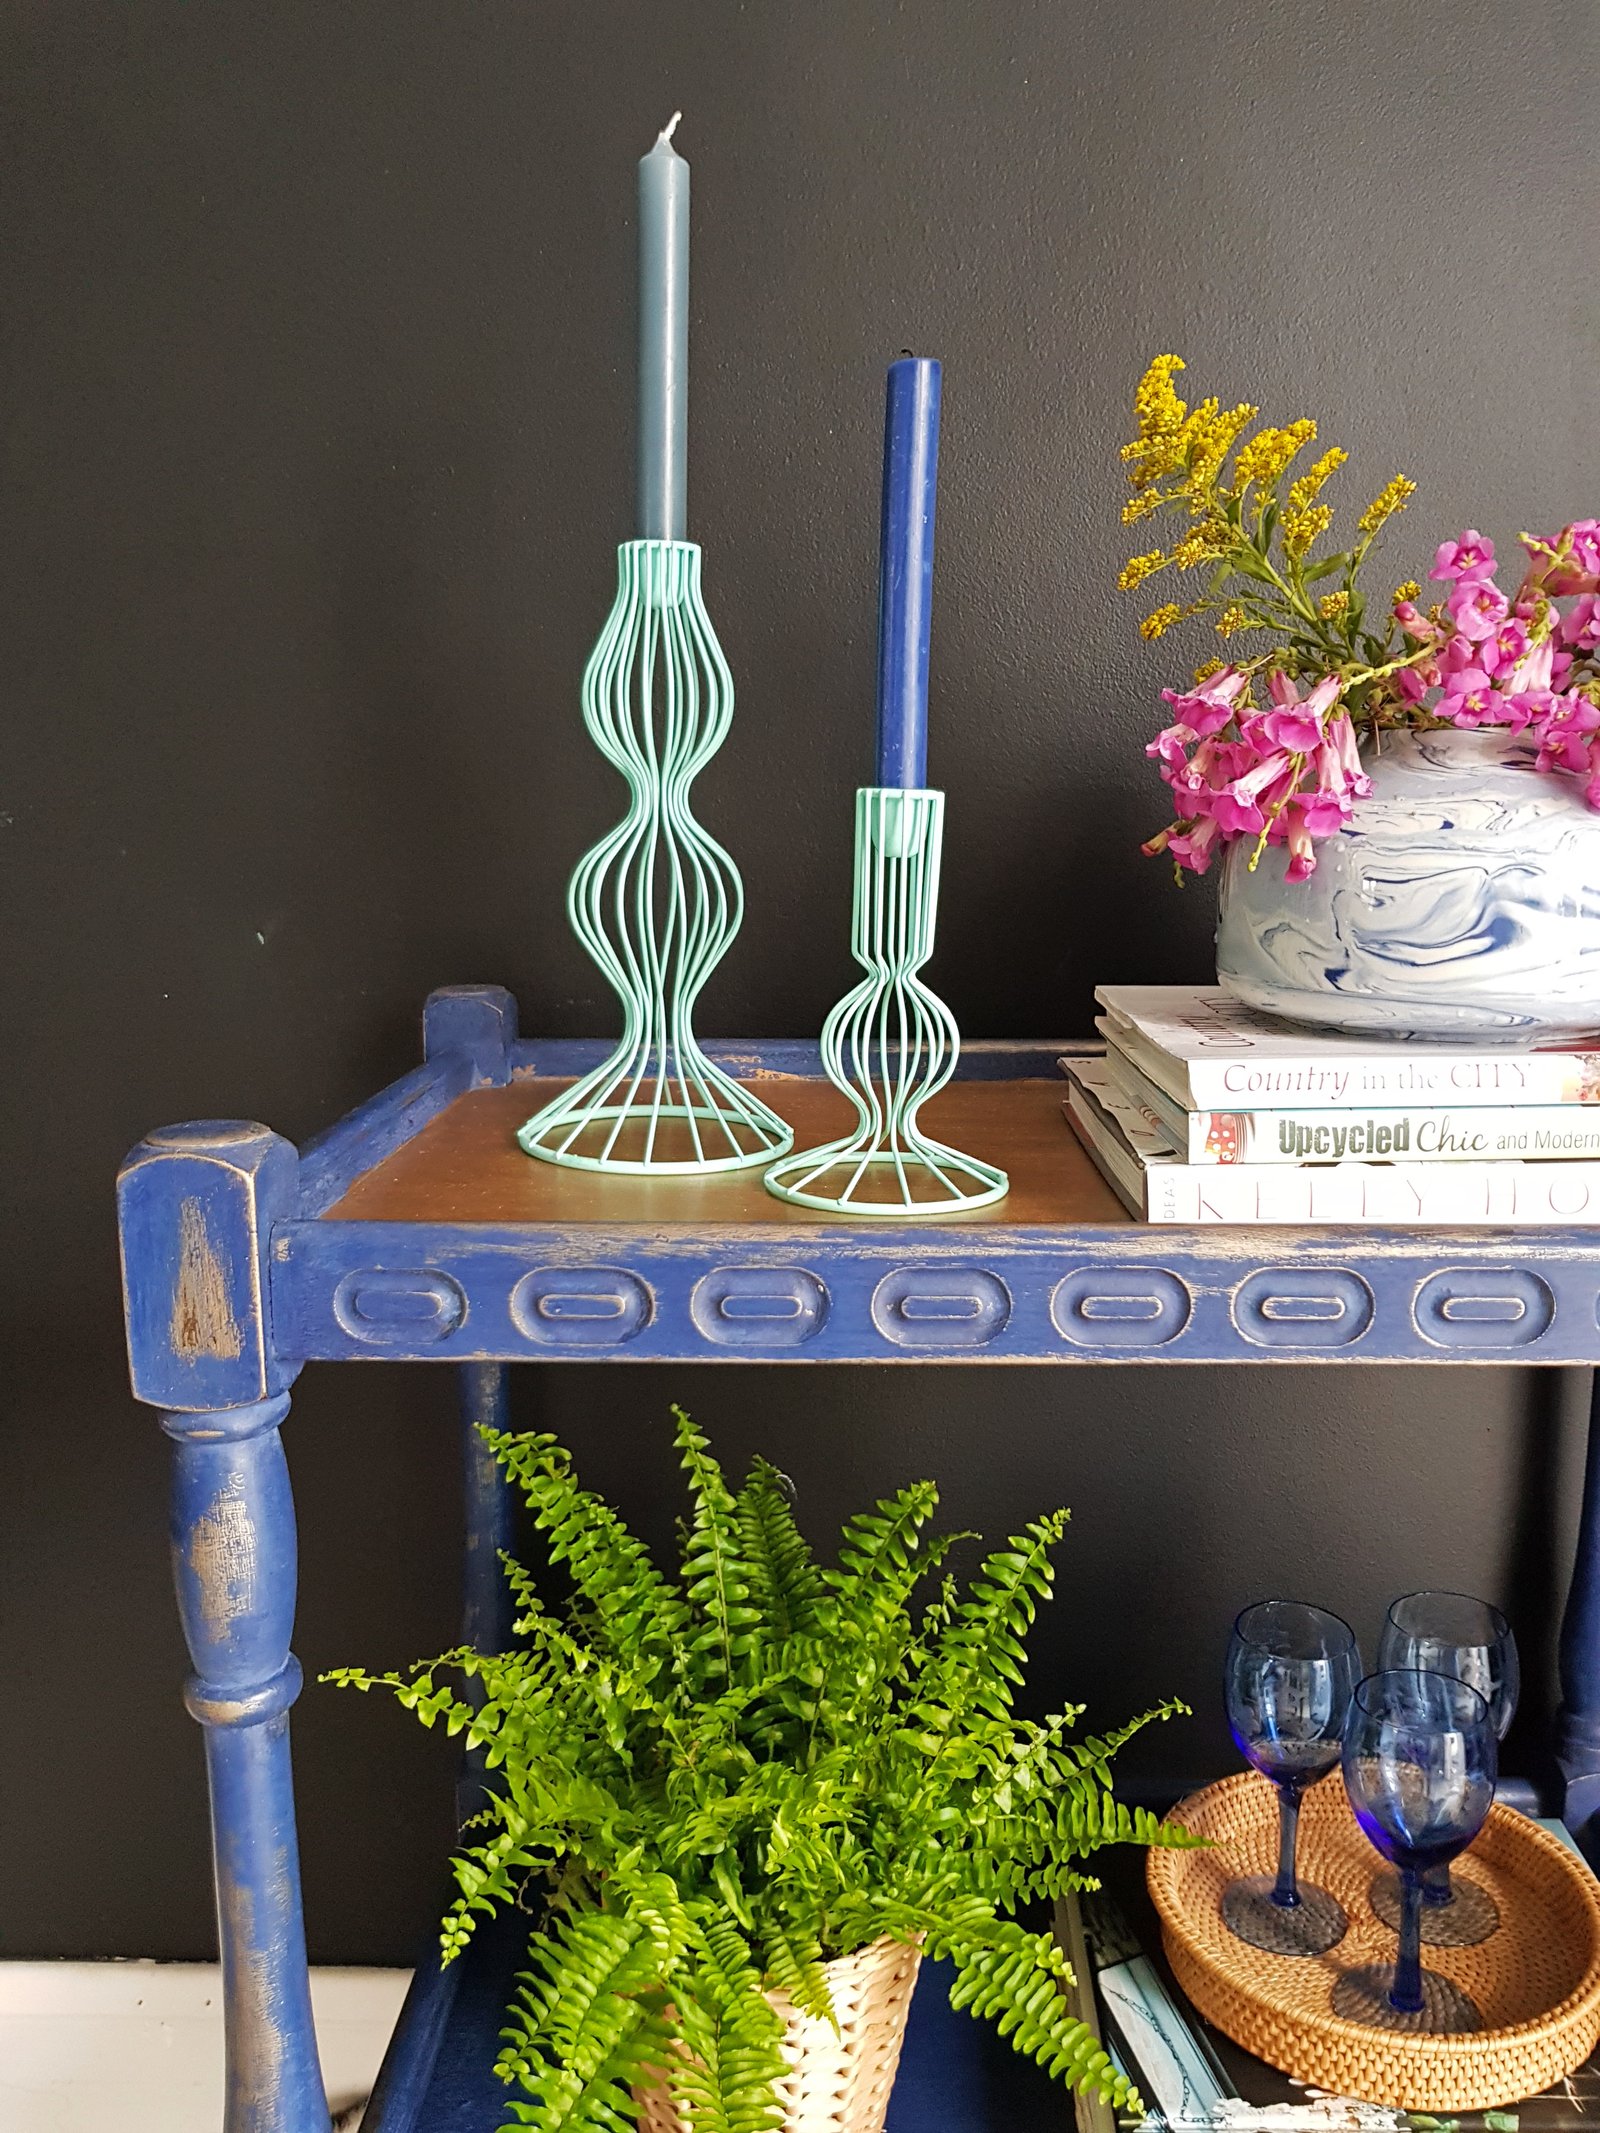
1.Start with the largest pieces from your bunch of the things you want to have on the shelf/sideboard/chest of drawers. Then move on to the medium size ones with the smallest joining the gang last. It doesn’t mean you have to group the objects according to their size. Actually you mustn’t do that! It is just the easiest way of having it done right! You wouldn’t want to start admiring your perfectly styled shelf (and feeling pretty smug with yourself) only to discover that you forgot to place those ten books that actually were the reason behind this styling!
2.Back to grouping objects. Try to go for odd numbers, like the group of three or five. And go for varied heights. It’s a simple trick that stylists use and it’s a one that guarantees to add interest to your shelf.
3.Books are for styling! OK, they are for reading too… but they make for perfect raisers for those less practical and more decorative objects. (Now you see… big books first, little dust catchers on top) And if you have more than just few books, you could colour-code them along the shelf which is just another way of making practical items look pretty too.
4.Add something green! when I said “easy to follow tips” for styling, this is exactly what I meant. There is nothing easier than adding a plant or two. Or even better, pretty vase filled with some pretty flowers. Especially at this time of the year it is so inexpensive (or even free if you cut flowers from your garden) way of styling your home. And they guarantee to put a smile on your face too, so why not?
5.Make it practical as well as pretty. There is no point in styling a pretty shelf if all the objects on it are for decoration only. Is it a show home you’re styling? Or is it your home? So first of all make sure that you establish what is it that need storing on top of that chest of drawers before you start adding pretty things. For me, it’s usually the books and the magazines as we don’t have any book shelves in the house. So they always land there first. You can also use small baskets and colourful boxes to store some bits and bobs in them. It will help you stay organised too!
So there you go… From just one post you’ve learnt about painted furniture and how to do it yourself. And now, with my easy styling tips, you know hot to style them too!
You’re welcome (blinking eye emoji)
I’m really inspired to get painting. I love an up cycling project! Also great styling tips. Thanks so much!
Thanks Donna. I love painting furniture. It’s very relaxing ?
That’s so cool and a great update, so transformative. The two colours is clever.
Thank you Mary. Yes, the gold paint has made all the difference ?
you have truly done an amazing job hun wow what a transformation x
Thanks Pati. I enjoyed making it ?
I’m not a big fan of the distressed look, but I like how this turned out! Looks great!
Thank you Stacy. I have to say I’ve always been into that distressed look but I think I had enough of it by now and this could be actually my last distressed project ??
Wow what a transformation! Looks amazing!
Thank you Sam ?
I recall seeing you in the throes of painting this trolley over on Instagram and it’s so lovely to see it finished. You’ve definitely got great painting skills and I love the way you’ve styled it too 😀
Thanks Maria, yes, it’s been a while since I actually did it. Like everything else in our house it takes a lot of time for things to actually get done ??
Loving the paint effects Anne Marie – good tip about waxing it afterwards I wouldn’t have thought of that !