
It’s finally June and we are officially on our way to the summer days. Maybe the weather is dragging a little bit behind us but at least it is heading the same direction (or so I hope). Most of us will have that summer-ready wardrobe sorted (not me) and toned beautiful summer-ready bodies to fit into that new dresses (nope, not me again). These days I’m only good at making my house summer-ready! Everything else is left till the last-minute (or till the next year). My house is my priority. After my kids obviously! (I wasn’t planning to add that bit about the kids but the guilt made me do that.) So back to the house now… I wanted to swap my rather dark looking art in the living room for something lighter, more colourful and more fun! I looked for some DIY wall art ideas on Pinterest and, oh boy, the place is just full of them! So after scrolling down the page (for about two hours – it’s so addictive!) I decided to have a go at my own DIY wall hanging. It was pretty, easy to make and, as I always have some yarn in the house, I didn’t have to spend any money. All I needed was to take kids for a walk and find some decent looking branch. And so we did just that.
So here’s what you will need to make your own DIY wall hanging

- yarn in a colour of your choice (you can go as colourful as you like)
- a branch picked up in the park
- scissors
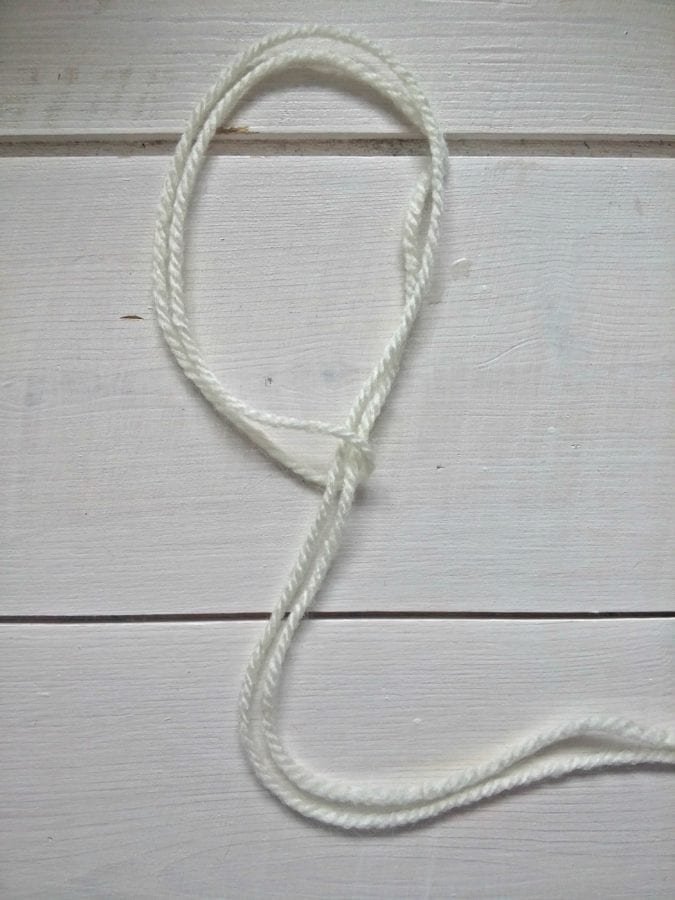
Cut first two lengths of yarn. They actually need to be quite long at this stage (about 2m each). Fold in half one of them and tie around the branch. Check if you’re happy with that length. Then you can use the other piece of yarn for measuring the rest. Cut as many pieces as you think you will need in the first colour. (Or quite a lot of them if your wall hanging will be all in one colour) You don’t have to worry about the yarn to be exactly the same length at this stage. They will be trimmed at the end.


Work your way from side to side or, if you’re not sure about the proportions of the colours, from sides towards the middle of the branch.


You can use as many colours as you like or make it a one-colour wall hanging – it’s up to you! Also not keeping the balance between the colours will make it more interesting. Finally don’t forget to tie at the ends to secure the yarn.

Use one piece of yarn to hang it on the wall before trimming your wall hanging. I used a tape to make straight but unsymmetrical lines. You can cut yours anyway you like. Probably an arrow shape pointing down would look good too.


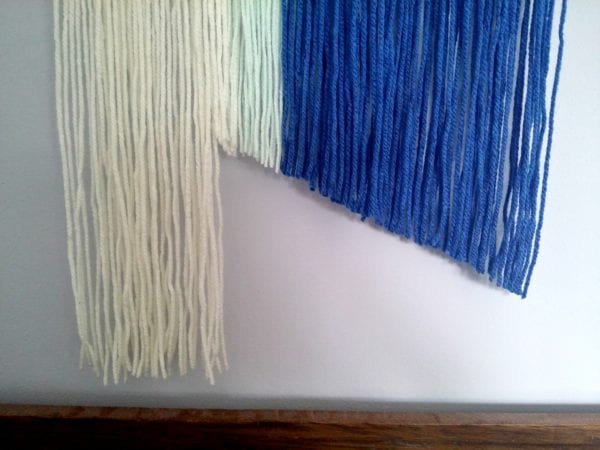
You should end up with something like this:


And so here it is. My summer-ready corner of my living room. Now I have to work on that summer body… (or more likely- on the rest of the house).


Related News

Caroline
June 17, 2017I love this! It looks fantastic and so simple to make too. I really love the colours you chose.
Anonymous
June 19, 2017Thank you Caroline. Sometimes I wonder why I haven’t called my blog The Blue House or Mad about the Blue as everything I do is blue 🙂
Marta Hutt
June 13, 2017Cute idea with retro / beach wibe and your styling is on the spot as always.
Anonymous
June 13, 2017Thank you, it’s so nice to hear as I always think that it’s just me liking my styling 🙂